One of the most common posts on the various homebrewing subreddits is an image of a fermentation with the question, “Is this mold?” It’s so common that /r/homebrewing has a bot that responds! Mold is a huge concern in homebrewing, but how do you determine what is and isn’t mold? And what do you do about it when you find it?
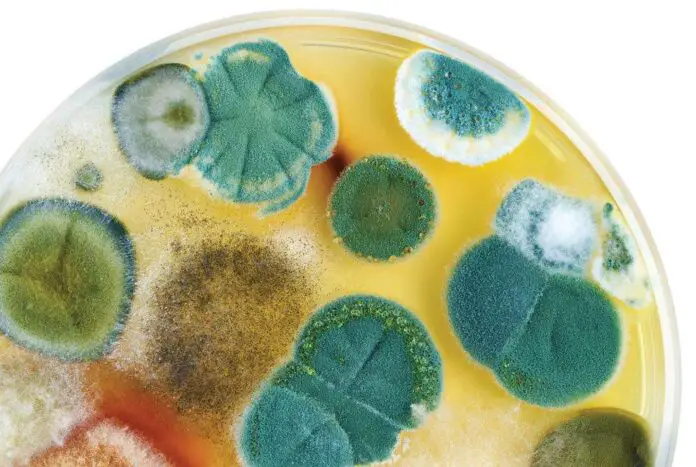
Mold on beer, mead, or wine has the same appearance as mold that would grow on other food items: fuzzy and discolored, floating on the surface of the liquid. Mold cannot penetrate the liquid, but some species can produce mycotoxins, which are unsafe for consumption. If your brew has mold, it is best to dump the batch.
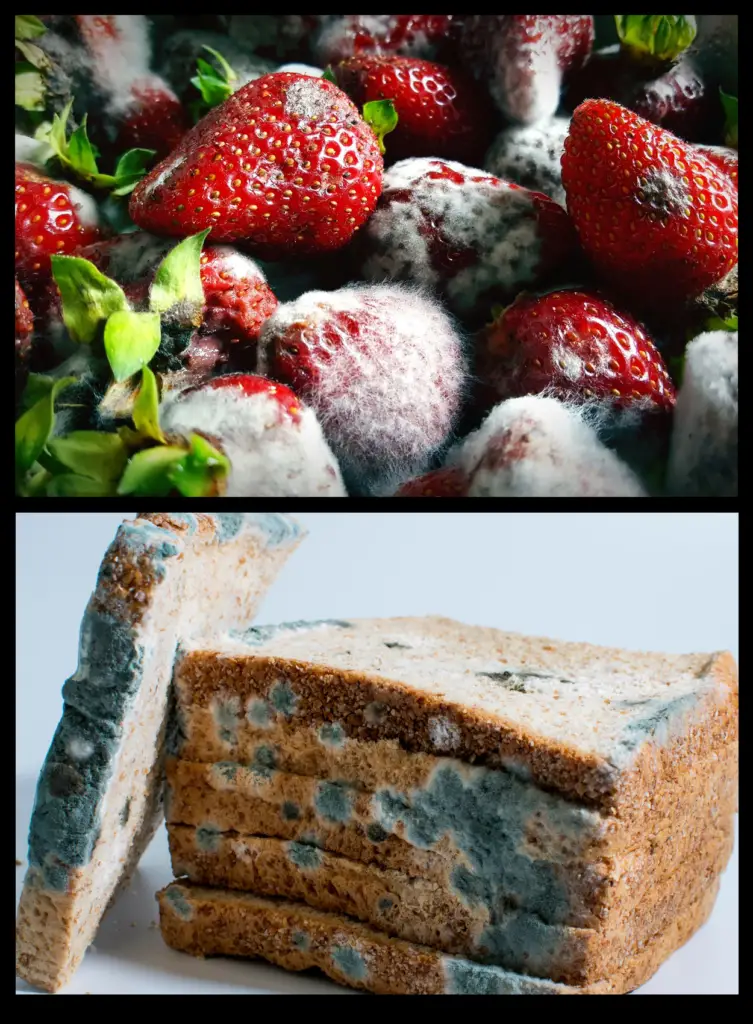
It’s actually really easy to tell if there is mold growing on your brew: It looks exactly like any other mold you’d see growing on any other food item. It’s the same as moldy bread, veggies, or meat.
New brewers often get concerned when they see fermentation for the first time, but a foamy krausen or sludgy bits of yeast are not mold. Additionally, if you see a solid white formation – either flat, bubbly, or rippled – this is a pellicle, and is a sign of wild yeast rather than mold. Still an infection, but not a hazardous one.
If you’re curious about wild yeast, or think you have a wild yeast infection in your brew, check out this other article covering that topic.
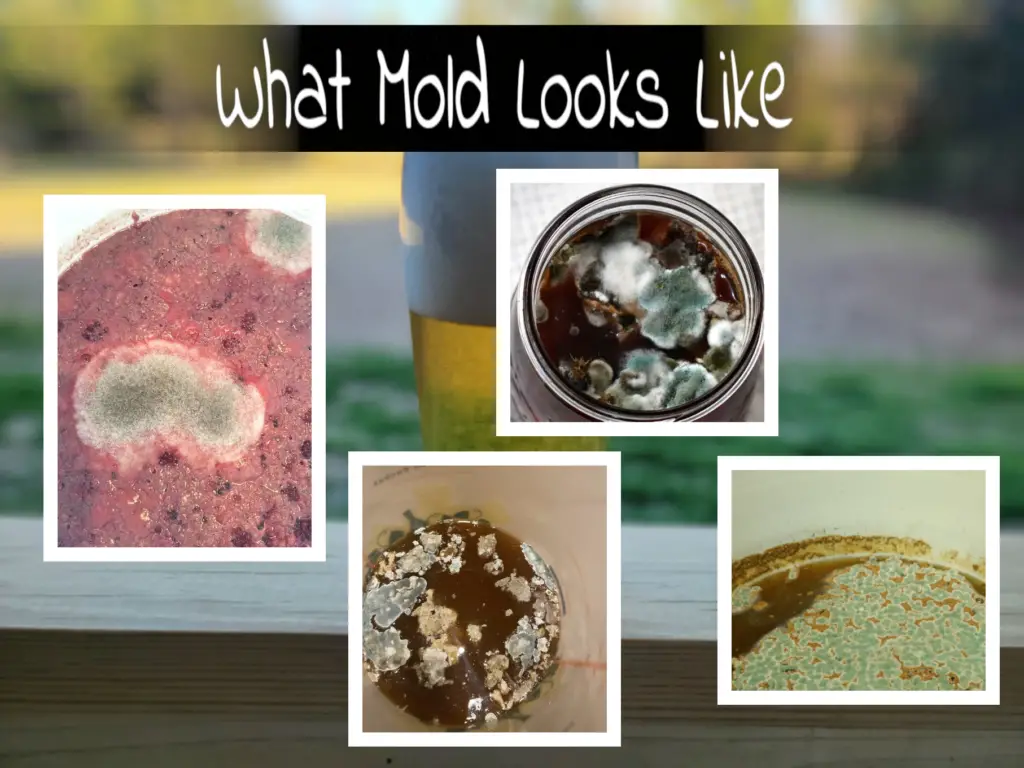
Mold is decidedly different from these other formations. It’s always fuzzy or furry, not solid or sludgy. It can be white, green, blue, black, or multi-colored. I’ve added some images of mold here as well as in the “How to Determine if it is Mold” section below so you can familiarize yourself with it to better pick it out if you ever need to.
Mold is hazardous to your health. The mold itself can be killed just with the alcohol from your brew, so it is not necessarily the problem (though it will taint the flavor), but certain mold species produce mycotoxins. Once these toxins are dissolved into the liquid, you’re not getting them out – no amount of boiling or chemical treatment available to a homebrewer will fix the batch.
I suggest if you see mold on your brew, dump the batch. Not all mold will kill you or make you sick, but to determine whether the mold you have is one of the species that does or not, you would need a laboratory analysis and a solid understanding of the different mold species.
And if you have all of that, you’re probably not trying to learn about mold from an article about homebrewing.
There are some suggestions that are often thrown around on how to salvage a batch once mold is present. I will cover those processes in detail below for the sake of being thorough, and it is up to you whether it’s worth the risk to follow them. However, again, I suggest not doing that. At the homebrew scale, a single batch is not terribly expensive, and definitely not worth risking your health over.
Just dump it and try again – and be more rigorous with your sanitation efforts!
What Is Mold (As it Relates to Homebrew)?
Unlike in some of the other “Is Your Brew Contaminated?” articles, I’m going to keep this at a really high level. It’s not really important or relevant to cover mold spore microbiology in detail. But there are a few things about mold that are helpful to know – so you can understand how it works and how to prevent it.
Mold is a fungal growth that forms and spreads on damp or decaying organic matter. It’s a “universal decomposer” that can chew on and dispose of basically all other lifeforms.
Your wort or must is full of organic matter, and the space within your fermenting vessel is very damp. Seemingly an optimal environment for mold growth, right?
In actuality, it’s not. Mold cannot survive in the liquid due to the alcohol content, and under the preferred circumstances, mold cannot grow in the headspace of the vessel, because it needs oxygen to survive. This means that, if you’re doing what you’re supposed to – keeping your equipment sanitized and keeping oxygen away from your brew (you should be doing so to avoid oxidation and make something good anyways!) – then your brew should be safe and you don’t have to worry about mold.
The vast majority of molds are actually harmless, but a very small number of them produce mycotoxins which are incredibly dangerous. These mycotoxins, if ingested, can have a range of negative health effects from allergy to liver failure to cancer.
While it might sound like the chances of getting sick from mold are low, the entire subset of mold species that produce mycotoxins are ones that exclusively grow on our food (including beer, mead, and wine!). Chances are actually pretty high that, if you see mold on your brew, it’s producing mycotoxins and poisoning it.
Even if the mold is harmless, it’s still going to affect the flavor and aroma of your beer, mead, or wine. Unlike Brettanomyces, which can be used in small amounts to add complexity to a brew, the flavors mold produces are almost universally considered bad. If mold is growing on your brew, it is, at best, tainted.
How Do You Determine If Your Brew is Infected With Mold?
To a new brewer, everything looks like mold or botulism. Fermentation is a bit of a funky adventure (to all of our senses) so it can kind of catch a person by surprise if they’ve never witnessed it before. But how do you actually tell if it’s mold?
Mold on your beer, mead, or wine looks the same as mold on any other food item. It is easy to distinguish from other formations, like yeast rafts and pellicles. Mold is furry or fuzzy, floats on top of the liquid, and can be white, green, blue, black, or multi-colored.
It is very obvious if you have mold.
Fermentation produces a number of different formations that can be visibly off-putting to a new brewer, and are often mistaken for mold. However, they look decidedly different, and it is fairly easy to discern mold from a normal occurrence or even a different kind of infection.
A solid white pellicle is a sign of a wild yeast or bacteria infection, and is typically not harmful. For more information on pellicles and the contaminants associated with them, please check out this article on wild yeast or this other one on Lactobacillus.
A completely healthy fermentation will also produce a few formations.
While fermenting, yeast will float up into solution, often clumping up in solution or floating atop the liquid in gooey brown or tan clumps of various sizes. These yeast rafts (as they’re called) are perfectly normal. They’re gooey and sludgy rather than furry or fuzzy, much like the eventual yeast sediment on the bottom after flocculation.
Additionally, while fermenting, the yeast throw off a ton of CO2. This causes the brew to bubble and foam up as krausen, which is also perfectly normal and healthy. Krausen will often leave behind brown sludge and solid particles around the sides of the container once it dissipates, which many new brewers mistake for infection. However, this is not mold – it is not furry or fuzzy.
Examples of mold are shown in the infographic below. Remember, it looks just like any mold you’d find on any other food item!
You Have Mold: Now What?
So now that you’ve determined you have mold in your beer, mead, or wine, what should you do with it? Is the batch salvageable?
If you have mold in your beer, mead, or wine, it is strongly suggested that you dump the batch. There are a handful of suggestions for steps to salvage an infected batch, but some molds can produce toxins that are very hazardous to your health. It is not worth the health risks.
Given the dangers of mycotoxins and the relatively low cost of a homebrew-sized batch, if you see mold, it’s best to just dump it and move on. Chalk it up to a learning experience, and be more careful with your sanitization next time.
However, there are a few suggestions that homebrewers sometimes give to help you try and salvage a mold-infected batch. I will list them in this article for the sake of being thorough, but I will do so with this disclaimer: I strongly suggest not doing this! If you see mold, you should dump the batch.
Supposedly following any of these suggestions will produce something drinkable. However, the batch will have been affected by contact with the mold.
1. Use Campden Tablets
Campden tablets are sulfites that can provide a number of benefits in homebrewing. They are often used by beer-makers on brew day to adjust the water chemistry, but even before that, winemakers began using them to help with sanitization and to stabilize the wine or mead when they want to stop fermentation.
Because sulfites can help kill off unwanted bacteria, yeast, and other microbes, they can be used to kill any mold spores that you find in your brew.
The suggestion is to use 1 campden tablet per gallon – so for a 5 gallon batch, you would add 5 campden tablets. Crush up the tablets and add them directly to the liquid in the fermenter, and then wait until they dissolve completely.
Once the campden tablets have dissolved, you will want to rack your batch to get it away from the mold in the headspace. Be careful to only transfer the middle of the batch – do not transfer any of the liquid on top, close to the mold, as it will be the most tainted.
You will have quite a bit of loss.
Optionally, you can add more sulfites after racking to ensure sanitization.
2. Remove the Mold Layer
If the mold growth is in a single layer, another option is to simply remove the mold layer from the top of the brew.
Make sure to use sanitized hands or sanitized tools (such as spoons) to remove the mold. You can simply reach down into the fermenting vessel, and lift the mold up and out of it. If the infection is particularly bad, it will form a single discrete layer across the top of the batch, and you will be able to pick the entire formation up from the brew.
Note that sometimes, mold will form a more “fluffy” formation that fills the entire headspace. Trying to remove the mold this way will likely not work as well in that case.
Once the mold is removed, you will likely want to rack the brew into a new vessel to get it away from the infection.
Again, best advice says to try not to disturb the liquid as much when removing the mold layer, and then only rack the middle of the brew, leaving behind any liquid that was touching the mold.
3. Stir the Mold Back In
Alcohol kills mold spores, and mold can only survive in your fermenting vessel in the headspace – away from the alcohol and acidity.
Mold cannot survive in the alcoholic environment of the liquid.
For this reason, if you just stir the mold back into the liquid, it will die off. Be cautious not to oxidize your brew by stirring too vigorously and introducing too much air!
Once you’ve stirred the mold back in, wait a few days and then transfer the brew into a new vessel. The mold will be killed off fairly quickly, but you should give it some time for any solid particles to settle out and to ensure the mold doesn’t come back.
Will a Mold Infection Kill You?
Now for the main question: is a mold infection dangerous? Will drinking an infected batch make you sick or kill you?
If your homebrewed batch of beer, wine, or mead has a mold infection, it can potentially be dangerous to drink. Ingesting mycotoxins that some molds produce can result in allergy, illness, or even death.
Mycotoxins produced by mold are very different from toxins produced by bacteria.
Most bacterial toxins are proteins, which can easily be destroyed by boiling, acidity, and high alcohol content.
However, mycotoxins are small stable organic chemicals, which are not destroyed by these things; once they’re dissolved in your brew, they’re almost impossible to remove.
Furthermore, they can be very dangerous to ingest. Some results of ingesting mycotoxins include simple allergic reaction, liver and kidney damage, immunosuppression, reproductive issues, and even cancer.
Mycotoxins can build up in your system over time. Even if you don’t notice problems after drinking an infected batch the first time, as you ingest more (even with long periods of time in between) it can cause more and more damage, eventually resulting in something really bad such as cancer.
It is true that, of all mold species, the ones that produce mycotoxins are relatively rare in nature. However, the ones that do are much more common in our homes, and thrive in our foods. If you see mold in your home or your food, chances are better than 50% that it makes mycotoxins!
The only way to be sure that your brew is truly safe after a mold infection is lab analysis – which is not a reasonable solution for a homebrewer and, given the relatively low cost of a small batch, probably not worth the price.
If you have a mold infection, your best bet is to just dump the batch and move on.
How Can I Prevent Mold in the Future?
Unfortunately, the best advice is to just dump your mold-infected brew and treat this as a learning experience. But what did you learn from this? What can you do next time to ensure that it doesn’t happen again?
A mold infection can be prevented when homebrewing with rigorous sanitization throughout the brewing process, keeping headspace in the vessel to a minimum after primary fermentation is complete, and limiting contact between your brew and outside air.
If you follow basic best homebrewing practices, you should be able to easily avoid mold. That’s why it’s fairly uncommon. Even though most new homebrewers are worried about mold infection, and are likely to think they see mold when it’s not there, it’s actually pretty rare to get mold in your brew if you do the things you’re supposed to.
There are a few basic things you can do to avoid mold in your beer, mead, or wine; but these are things you should be doing anyways if you want to produce the best-tasting, most enjoyable product you can!
1. Proper Sanitization
This topic could fill its own article (or category of articles) so I will keep it short and simple.
Everything that comes in contact with the brew should be sanitized. Sterlization (complete removal of all microbes) isn’t necessary because, during fermentation, the yeast will outcompete other microbes that are in small numbers and quickly kill them off. However, it is important to keep microbes to a minimum.
This can be done a number of ways, but my preferred method (and the preferred method for most homebrewers) is to use a no-rinse sanitizer like Star-San.
Simply dunk everything in your no-rinse sanitizer before it comes into contact with the brew.
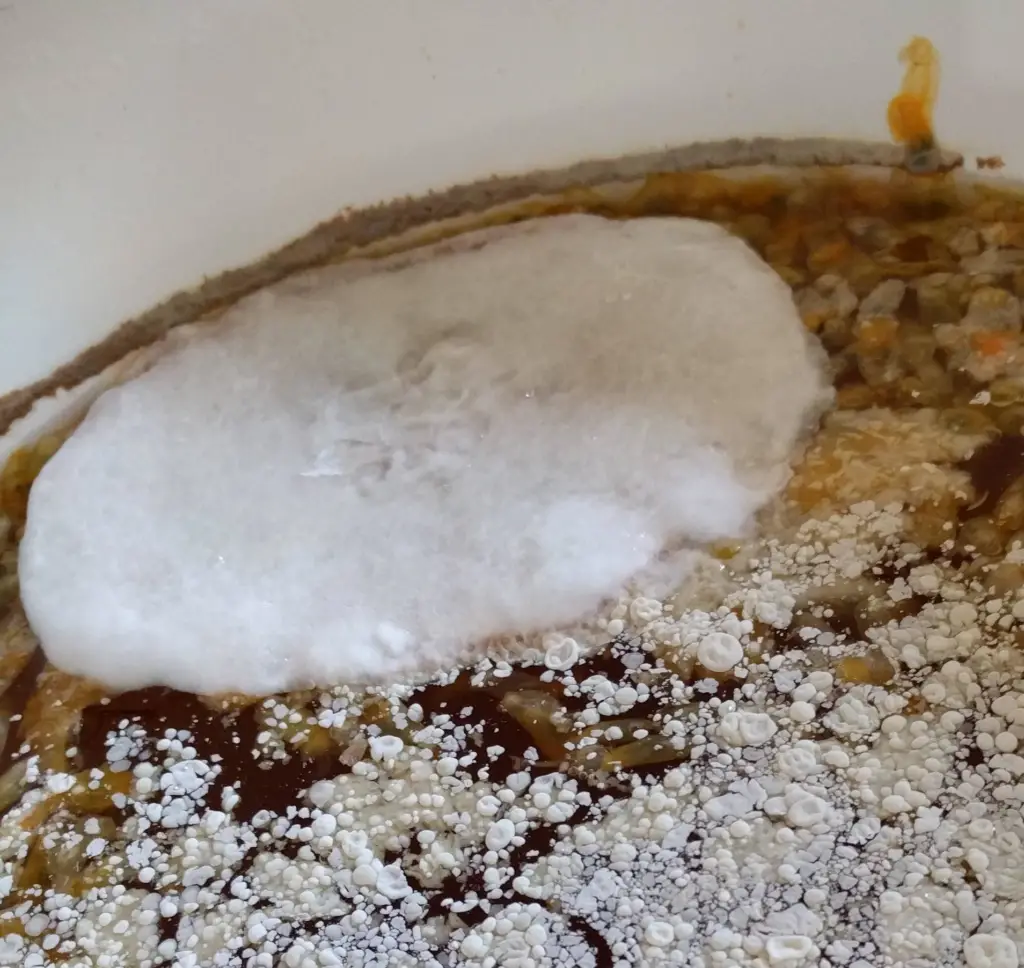
The only time I ever had a mold infection was, in part, due to a misstep in my sanitization practices. It was a banana wine that I found, after fermentation was complete, to be very bland. So, I added oak chips to try and impart some extra tannin – but the oak clearly wasn’t clean and must have had mold spores on it, because the headspace of the vessel quickly filled with white, fuzzy mold that looked much like the seedhead of a dandelion.
By sanitizing the vessel, racking equipment, and everything that comes into contact with your brew, you will kill off any mold spores before they get the chance to take hold and grow in your brew.
But you should be sanitizing everything anyways – to prevent all kinds of infections and off-flavors, and to give your yeast the perfect environment to thrive so they don’t get stressed out.
2. Minimize Headspace After Primary Fermentation
Mold cannot grow in the beer, mead, or wine because the brew itself is a very hostile environment for the mold spores. The alcohol and acidity will quickly kill off any mold spores that are submerged.
Additionally, mold needs an oxygen-rich environment to grow.
If there is enough headspace in the vessel, and mold spores can sit upon the surface of the brew – away from the alcohol and the acidity, and in contact with the air – the mold can thrive.
During primary fermentation, this is a non-issue. In fact, for more vigorous fermentations, you likely want plenty of headspace to give the brew room to bubble up and form a krausen. The headspace will be filled with CO2 and other gasses produced by the yeast, which will push any oxygen out of the vessel and protect the brew from any mold spores that may have gotten in.
But after fermentation is complete, you need to be much more careful. Extra headspace provides more air which, if any oxygen makes its way in, provides more space for mold to thrive. Additionally, it creates a larger surface area at the top of the liquid where the mold can sit.
When racking your brew into a new vessel for aging, you should try your best to select an appropriate vessel – find one that is as close to the correct size as possible for the amount of beer, mead, or wine you are transferring.
Often, you will have loss due to the yeast sediment and any other solid particles that have settled out of the brew, so it is a good idea to have vessels of various sizes, and to rack a brew into increasingly smaller vessels to minimize headspace.
The one time I’ve had a mold infection (the banana wine I wrote about above), in addition to the sanitation misstep, I also did not follow this advice about headspace. There was quite a bit of loss from the banana solids, and I did not have a smaller vessel to rack the wine into; so in secondary, the vessel was only about ⅔ full. This gave the mold quite a bit of room to breathe, and it ended up filling the entire space with a fluffy white formation!
3. Avoid Oxygen (After Primary Fermentation)
This goes hand-in-hand with minimizing headspace.
As already stated, mold needs oxygen to survive. If your vessel remains devoid of oxygen then mold can never get a foothold, and can never survive in your brew.
Minimizing headspace is just one part of this. Even with extra headspace, as long as there is no oxygen in the vessel, your brew will be safe.
Your yeast will throw off CO2 and other gasses during fermentation, while consuming any oxygen in the environment, leaving the vessel free of oxygen as long as it remains closed and sealed. Your airlock, blowoff tube, or similar device will allow pressure to release and CO2 to force any oxygen out of the vessel, creating a safe environment in the headspace.
One way to avoid oxygen is to leave the vessel sealed. As long as it is not opened, oxygen cannot get in, and the protective CO2 layer remains.
It’s not always possible to never open the vessel, but if you try to do it as little as possible and, when you have to, close it up as quickly as you can, it should reduce the risk of infection (and oxidation).
Additionally, you can fill the headspace with an inert gas to keep oxygen out of the vessel. Using your CO2 tank and kegging setup to blow CO2 into the headspace is a common way to solve this issue.
A similar solution (though kind of done in the opposite way) is to keep it sealed and always do a closed transfer when racking, moving your liquid from one vessel to another using CO2 pressure, and always transferring into a sanitized vessel that was previously filled with CO2 and devoid of oxygen.
You should be striving to limit contact with oxygen anyways, not only to reduce infection, but because it can definitely impact the quality of your brew. Of course, it’s really hard at the homebrew scale to perfect this. My biggest hurdle in going from making mediocre products to good ones (as I assume is the same for most homebrewers) was learning how to reduce the chances of oxidation.
4. “Punch Down” Any Fruit (or Other Solids)
If you are brewing with any solids that float to the top of the liquid – fruit, in particular – then you will need to be sure to push it back down into the liquid periodically to ensure it remains submerged.
This applies to fruit beers, wines, meads, ciders, and all other brews that can use fruit. It does not apply to hops; while hops do float atop the surface of the liquid, they are antimicrobial and will not grow mold.
However, other solids – fruit in particular – can and will grow mold if given the opportunity. Fruit that remains above the surface of the liquid, especially in an oxygen-rich environment, is the perfect place for mold to thrive away from the yeast and alcohol.
Once it is submerged in alcohol, however, mold spores are unable to survive and are quickly killed off.
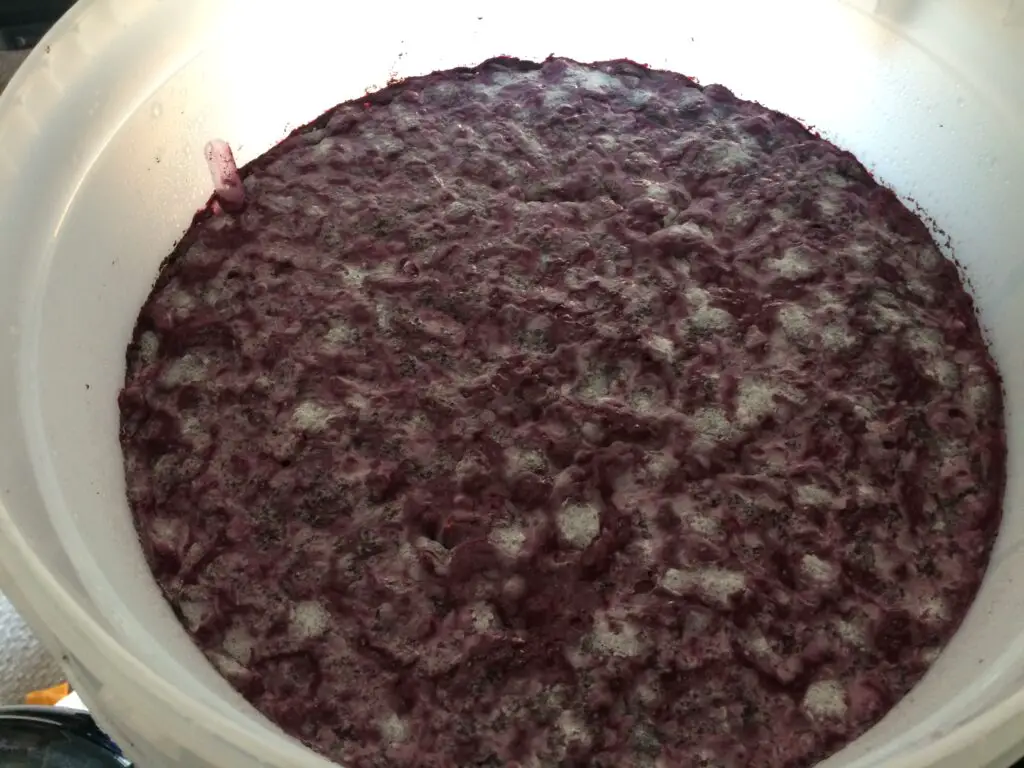
In professional winemaking, wineries will punch down the grapes up to three times per day.
You should watch your brew closely to see when a cap forms; it can take several hours between punch-downs for a new fruit cap to form, but you should be careful to punch it down quickly once it does to limit the chance for mold to grow and start producing mycotoxins.
Most of the fruit will eventually start to settle towards the bottom of the vessel, and if you find the fruit no longer staying at the surface of the liquid, you can stop worrying about punching it down. However, there can often be stragglers that never quite settle out.
An alternative option is to add the fruit to the must in a muslin bag (grain bag, hop bag, cheesecloth) that can be weighed down with a food-grade weight of some sort. I have seen brewers use sous vide magnets as well as stainless steel nuts and washers. This will keep the fruit submerged without needing to open the vessel periodically to punch it down, and has the added benefit of making racking easier!
It’s also a good idea to rack the brew to a new vessel for aging (or, alternatively, bottling or kegging) as soon as fermentation is complete to separate the liquid from the fruit and minimize the chances for growing mold.
Conclusion
So, in conclusion, mold is dangerous. It is harmful. It can potentially make you very sick. If you see mold in your brew, dump it! Do not try to salvage it.
However, mold is quite rare if you’re doing all of the things you’re supposed to in order to make a high-quality beer, mead, or wine.
Most of the time, when a homebrewer thinks they have mold, it’s really just krausen or yeast rafts. Even when it is an infection, a pellicle from wild yeast is far more common than mold.
It’s easy to discern mold from other formations in your brew – because it looks like mold!
So don’t stress about mold so much. Relax and have a homebrew, and let your batch do its thing.
And if it does turn out to be mold… well, just move on to the next batch, and be more careful next time.

